Follow us 
![]() or join our forum to receive updates on GenePattern projects and happenings.
or join our forum to receive updates on GenePattern projects and happenings.
Overview
GenePattern provides access to a broad array of computational methods used to analyze genomic data in a graphical user interface. Its extendable architecture makes it easy for computational biologists to add analysis and visualization modules. This ensures that GenePattern users have access to a continuously growing repository of new computational methods.
This user guide is targeted to two types of users: (1) those new to GenePattern who will run analyses on the public server and (2) those versed in using GenePattern who will customize the environment, e.g. install private modules, using a locally installed server. Additionally, this user guide assumes you are familiar with the fundamental principles and primary components introduced in the Concepts guide.
We recommend using the GenePattern public server, especially if you are new to GenePattern. The public server is ready to use from a browser, analyzes your data on a compute farm, provides site support and offers modules that are not available for local installation.
For new users who will run analyses on the public server, the first four sections of this guide cover the following topics:
For users who will install a local server for advanced customization, the remaining sections of this guide cover the following topics:
- Starting Your Own GenePattern Server
- Working with Modules
- Working with Pipelines
- Working with Suites
- Managing Modules, Pipelines, and Suites
Other resources of interest to new users are highlighted below.
- System Requirements makes sure you have the right hardware and software to use GenePattern.
- The File Formats Guide starts by introducing key concepts in using plain text files and describes file formats.
- The FAQ page answers common trouble-shooting questions, including instructions for browser and system settings to launch visualizers.
- Watch additional Video Tutorials covering a variety of topics.
- For documentation covering GenePattern server v3.5 and prior, see the Previous Versions page.
- For module specific documentation, use the Documentation link present for the specific version of the module loaded.
- Use the Learn, Resources, and Blog menus at top to access the most current information.
- The Blog provides up-to-date information on a variety of topics including bug fixes and server downtimes.
- We've transferred our previous site's In-Depth Articles to the Blog. These are brief articles and tutorials written in response to questions from our users or to share information about new GenePattern features, modules or pipelines.
- For up-to-date information via Twitter, follow @GenePattern.
- Release Notes details new version features and bug fixes for users and administrators alike.
- The Blog provides up-to-date information on a variety of topics including bug fixes and server downtimes.
- Programmers Guide. Guidelines for writing modules and instructions for accessing GenePattern from the Java, MATLAB, and R programming environments.
- Administrators Guide. Information on how to configure and secure a local or networked GenePattern server.
Getting Started
If you have experience using online tools, but are new to GenePattern, we offer basic tutorials to get you quickly oriented. Many users find that this is all they need to begin using GenePattern.
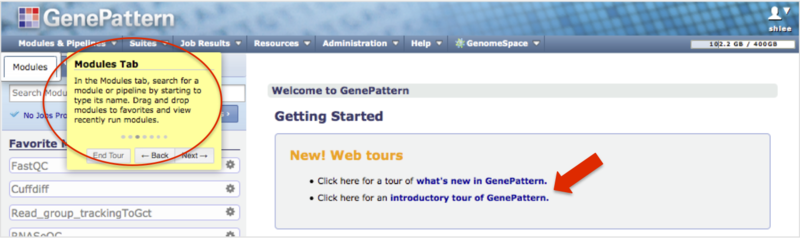
- Quick Start provides a 10-minute overview and video on how to run an analysis and review results.
- Web tours walk you through the user interface while highlighting features as circled. Click on their links (arrow) to start the Introductory tour of GenePattern or the What's new in GenePattern web tours after logging into your account.
Using a GenePattern Server
To use GenePattern, you open a web browser and enter a URL. The URL that you enter is the address of a GenePattern server as shown below.
|
URL |
Server |
| GenePattern public server. This URL connects you to the GenePattern server hosted on Amazon AWS. | |
|
The URL for a networked server, for example: http://mycompany.com:8080/gp/ |
GenePattern networked server. A GenePattern administrator at a company or institution can install a GenePattern server and make it available to you. Use the URL of the networked GenePattern server to connect to that server. |
For example, to use the GenePattern public server at https://cloud.genepattern.org:
- Open a web browser, such as Firefox, Chrome, or Safari.
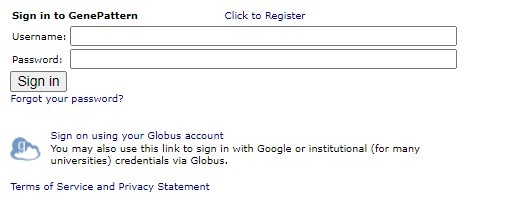
- Enter the URL of the GenePattern public server and log in with your user name and password.
- If you do not have a GenePattern account, select Click to Register.
-
A local server may not require a password depending on configuration.
Cannot connect to server: If the web browser cannot connect to the server, it displays such a message.
- If you are using a networked or the public server, wait a few minutes and try again. If the problem persists, contact the particular GenePattern administrator.
- If you are using your own local server, start the server (see Starting Your Own GenePattern Server) and try again.
To exit from GenePattern, click your username in the top right corner, and select Sign Out. Alternatively quit the browser.
Getting Help
Search for information with keywords in the top right search box. However, you may find module documentation and website resources do not answer your questions.
- In this case, please direct algorithm-specific questions to the contacts provided in the module documentation or related forums on Biostars and SEQanswers.
- For GenePattern server and site questions, or to report potential bugs in modules, please contact us.
User Interface
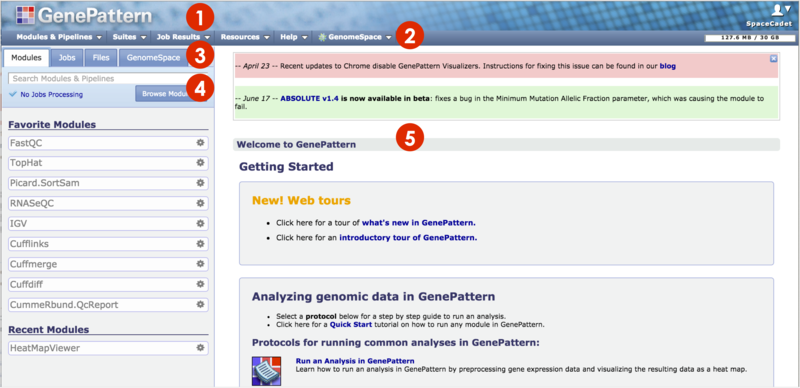
When first opened in your browser, GenePattern displays the home page. To return to this page at any time, click the GenePattern icon in the top left (1).
[placeholder I made--may want to replace]**
 |
The title bar includes:
|
 |
The Navigation Bar provides access to other GenePattern pages or features via drop-down menus. To the right, It also shows how much of your GenePattern account's disk quota you are using. |
 |
The Tabs Panel organizes the Modules, Jobs and Files tabs. Click on a tab to display contents below. Certain elements from this panel will slide out another menu to the right of the panel (not pictured).
|
 |
The Modules tab has you access modules and pipelines via a search box. As you type, e.g. TopHat or RNA-seq, matching choices are displayed in a slide-out menu.
|
 |
The center pane is the main display pane. GenePattern uses this pane to display information and to prompt you for input. Mainly, you will display the module or pipeline to run in this pane. Drag-and-drop files from the Jobs, and Files tabs to the input fields in this main pane. See Running Modules & Pipelines for details. Initially, the center pane contains a welcome page with the following content:
|
Jobs menu
When you run an analysis, GenePattern displays the job results in the Jobs tab. For the public server, these jobs are run on the hosted server and remain on the servers for a limited time. The Jobs tab lists pending, running and completed jobs by unique job number, module name and result files in reverse chronological order. Use the scroll bar at the right of the panel to see older jobs.
- Results in this tab are purged after a given period of time, depending on the server settings. For the GenePattern Public server, this is one week.
- To check the date of purge, click the circled (i) icon, and select Job Status.
- To save files, download or transfer them to the Files tab.
- Additional jobs launched from files within the Jobs tab allow for creation of provenence pipelines. Provenance pipeline creation is only possible from Jobs tab files.
- Access an alternative tabulated view using the navigation bar's Job Results.
- To increase the number of jobs that display, click on your username in the top right and navigate to My Settings>History and increase the number in the field.
Click job name to slide out a menu of commands for working with that job. For more information, see Working with Analysis Results.
|
Download |
Download a zip file containing all analysis result files for this job. |
|
Terminate |
Stop the job. This menu item appears only while the job is running. |
|
Reload |
Display the analysis and its parameters in the center pane, with the parameters set to the values used for this analysis job. |
|
Delete |
Delete the analysis job and its analysis result files from the GenePattern server. |
|
Info |
Display the parameter values and the analysis result files for this job. |
|
View Java Code |
Display the command line that you would use to run this job in the Java, MATLAB, or R programming environments. These commands are useful for programmers who want to access GenePattern from one of these programming environments or from their own applications. |
Additional options are available when clicking on individual files from jobs. [insert new table that includes "Create Pipeline""]
Files menu
You can upload and save data from your desktop to your GenePattern server account using the drag-drop feature at the bottom left of the panel. Additionally, you can transfer files from the Jobs tab to the Files tab for longterm storage. For the public server, the storage limit is 30 GB. See September 22, 2014's blogpost for details.
Click the file name to display a menu of commands for working with that file. For more information, see Working with Analysis Results.
|
Delete |
Delete the file from the GenePattern server. |
|
Save |
Download the file from the GenePattern server. |
|
Send to <input-file-parameter> |
Specify this file as the input file for the selected parameter. (Only appears when a module is selected.) |
|
Create Pipeline |
Create a GenePattern pipeline that includes the modules and parameters necessary to reproduce this result file. |
|
List of modules |
List of modules that accept this type of file as an input parameter. Select an analysis to display its parameters in the center pane. This result file is specified as the first input parameter. |
Navigation Bar
The navigation bar provides access to GenePattern pages and operations. 
If you log into another GenePattern server, such as your own local GenePattern server, you may see additional items in the navigation bar, e.g. Administration. These are marked by superscript in the table below.
|
Modules & Pipelines |
Display the GenePattern home page. |
|
Create a pipeline. |
|
|
Create a module. |
|
|
Install a module or pipeline from a repository. |
|
|
Install a module or pipeline from a ZIP file. |
|
|
Display installed modules or pipelines; delete modules or pipelines. |
|
|
Suites |
Display the Manage Suites page. |
|
Create a suite. |
|
|
Install a suite from the a repository. |
|
|
Install a suite from a ZIP file. |
|
|
Display installed suites; delete suites. |
|
|
Job Results |
Display the Results Summary page. |
|
Display jobs run on the server; delete jobs. |
|
|
Resources |
Display an overview of the resources. |
|
Report Bugs |
Display the form you use to contact the GenePattern team to report bugs, provide feedback, or ask questions. |
|
Contact Us |
Display a form, which you can use to send questions and comments to the GenePattern team. |
|
Downloads |
Display an overview of the available downloads. |
|
Programming Libraries |
Download and install GenePattern libraries for use with Java or Python. |
|
Public Datasets |
Download sample datasets for use with GenePattern. |
|
Administration1 |
Display the Server Settings page. |
|
Modify settings that affect the GenePattern server. |
|
|
Help |
Display the GenePattern home page. |
|
Tutorial |
Display the Tutorial, which provides a comprehensive hands-on tour of GenePattern. |
|
Video Tutorials |
Display the list of GenePattern training videos. |
|
User Guide |
Display this guide, which describes how to use GenePattern. |
|
Programmers Guide |
Display the Programmers Guide, which provides guidelines for writing modules and instructions for accessing GenePattern from the Java, MATLAB, and R programming environments. |
|
Module Documentation |
Display a list of the modules and pipelines installed on your server, with brief descriptions and links to the module/pipeline documentation. |
|
File Formats |
Display the File Formats Guide, which describes all file formats and provides instructions for creating input files. |
|
Release Notes |
Display the Release Notes, which describes new features and known issues in this release. |
|
FAQ |
Display the GenePattern list of Frequently Asked Questions. |
|
About |
Display the release date and build number of the GenePattern server. |
1Not available on the public GenePattern server.
My Settings & Log out
Access account settings or log out by clicking on your user name in the upper right corner. My Settings allows you to change the email, password and visualizer memory associated with the account. Additionally, you can change the number of jobs that display on the Jobs panel under History.
- Change Email: Change the email address for your GenePattern account on this server. The GenePattern server uses your email address for the following:
- When you run a module or pipeline, GenePattern sends the job to the GenePattern client and displays the Job Status page. On that page, you can click the email notification check box to have GenePattern send you an email when the job completes.
- If you forget your password and request a new password, GenePattern sends your new password to this email address.
- Change Password: Change the password for your GenePattern account on this server. Note: By default, GenePattern servers are installed without password protection. For information about enabling password protection, see the Administrators guide's Securing the Server.
- History: Use this option to specify the number of recent analyses listed in the Jobs panel on the GenePattern home page.
- Visualizer Memory: Specify the Java virtual machine configuration parameters (such as VM memory settings) to be used when running visualization modules. By default, this option is used to specify the amount of memory to allocate when running visualization modules (-Xmx512M).
Running Modules and Pipelines
An analysis module runs a single analysis. A pipeline runs a series of analysis modules. Within this guide, although we may refer to a module only, note that concepts apply to pipelines as well. If you are unfamiliar with GenePattern modules and pipelines, see Concepts.
Running a Module or Pipeline
You can either load a module and supply it data or click on a data file and select a module to run on it.
To load a module and supply its data:
- Start typing the module or pipeline name or analysis category in the search box on the Modules panel. As you type, e.g. HISAT or single-cell , matching choices are displayed in a slide-out menu.
-
Click on a choice to load analysis parameters into the main display pane.
-
Provide data files and fill in parameter fields. See Setting Parameters for details.
-
You can (1) Drag-drop files from your computer, from the Files panel. (2) Click the Upload File button to navigate your computer's file directory and select a file. Or (3) click the Add Path or URL button to enter the URL of the file or to select a file from a shared file system.
-
Parameter fields are typically text boxes that you type into. Some parameters provide drop-down menus to select options from.
-
Required parameters are asterisked.
-
Default values may be provided but you should adjust parameters to suit your analysis.
-
-
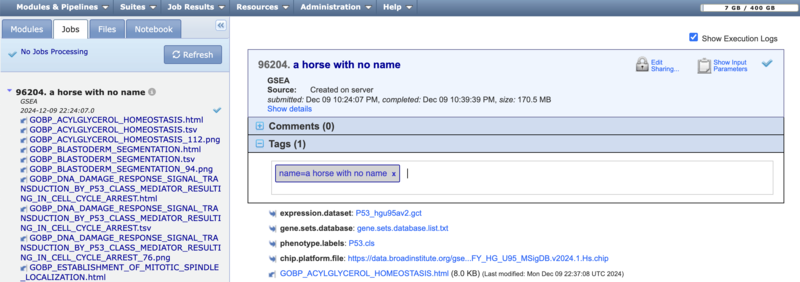
Optionally provide tags or comments for the job. You can modify these after submission. If you add a tag that begins with "name=" or "jobname=", then (for GenePattern build 427 or later) the provided name will be used when displaying the job in both the jobs menu and on the job status page.
-
- Click Run. GenePattern sends the job to the server and displays the Job Status page. How long a job takes to complete depends on the size of your dataset and the analysis that you are running.
- You do not have to wait for the job to complete. You can move off of the Job Status page to continue submitting jobs or log out of GenePattern. Your jobs continue to run on the public server.
- The Job Status page provides complete information about the job, including its parameters, input files, output files, and current status. Click on elements in blue, e.g. Show Input Parameters, to adjust or show additional options and information.
- While submitting other jobs, you can check the status of a previously submitted job on the Jobs panel. Click the Job ID number to slide out a menu of options that include displaying the Job Status page and reloading the job.
Alternatively:
- Click on the file of interest either from the Jobs panel, the Files panel, or the Job Status page.
- On the slide-out menu, the bottom portion displays all modules that accept the file type. You may need to scroll down to see all the modules. Select one to start an analysis on the file.
Licensed Modules and Pipelines
Some modules or pipelines may have associated end-user license agreements (EULAs). When you first run a licensed module or pipeline, you will be shown a window containing the license terms, where you can read the terms and choose to accept them or not. The license terms will differ depending on the module.

When you click OK to accept the license agreement, your acceptance is logged in our database. You will not be asked to accept the license terms when you use that particular module or pipeline again until and unless a new version of the module/pipeline is released.
If you choose not to accept the license agreement, you will be unable to run the licensed module or pipeline.
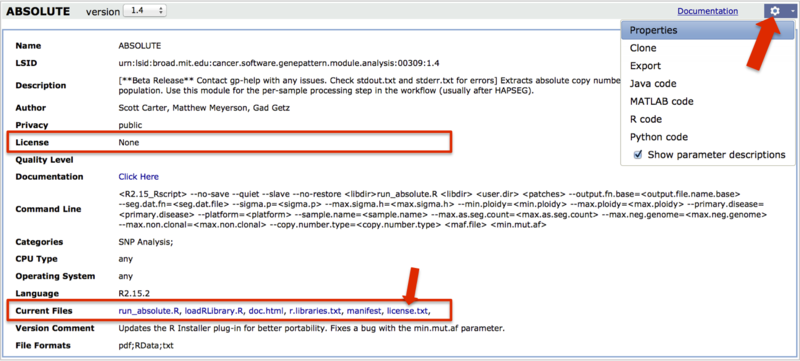
To view a license you have already accepted, load the module, click the gear icon and select Properties (large arrow). A link to the license may be under License or under Current Files (boxes, and small arrow). Additionally, module documentation may provide a link to the license.
Setting Parameters
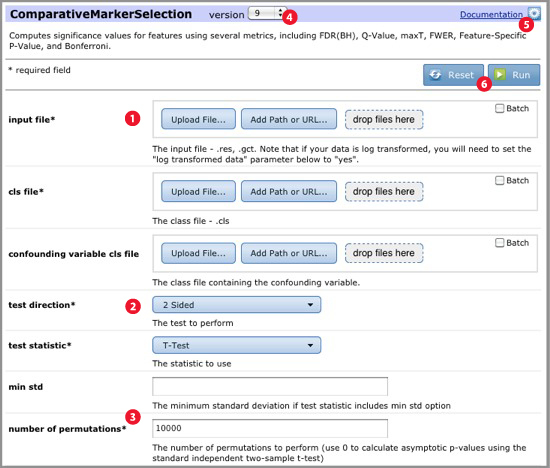
When you select a module or pipeline, GenePattern displays its parameters:
|
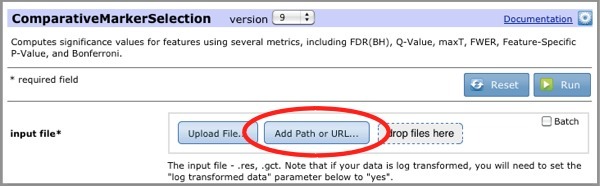
Most modules require one or more input files. There are several ways to choose an input file:
In general, uploading a file using drag-and-drop or the Upload File button is fine. However, if you are focused on a particular dataset, it may be faster to upload your files to the Uploads tab and then analyze the uploaded files. Just be aware that if you delete the uploaded files, you cannot rerun the analyses. If you have extremely large datasets, consider using file paths. You can save a significant amount of time by avoiding file transfers. |
| |
Specify other parameter values using the drop-down lists and entry fields:
|
|
Version of the module. If multiple versions of the module are installed on the server, GenePattern displays the latest version by default. Select a different version from the version number drop-down menu. |
|
The Documentation link displays the module or pipeline documentation. The Gear icon
|
 |
|
Rerunning an Analysis
- Display your analysis jobs in one of two ways:
- Click Modules & Pipelines to display the GenePattern home page, where your most recent jobs are listed in the Jobs tab.
- Click Job Results>Results Summary to display the Job Results Summary page, which lists all of your analysis jobs.
- Click the job that you want to rerun and select Reload Job. The parameters appear in the center pane set to the values that were used for the particular selected job.
Uploading Files
See the video tutorial: Using the GenePattern Uploads Tab
Files uploaded via module runs stay within the Jobs panel's associated regularly purged temporary storage cache (screenshot method 3). Files uploaded to the Files panel are stored in your account storage (screenshot methods 1 & 2). Uploading files to the Files panel provides the following additional benefits:
- To save time, frequently analyzed files can be uploaded once rather than being uploaded each time you run an analysis.
- Uploaded files (and analysis result files) can be used as the starting point for analysis. Click the file of interest. GenePattern displays a menu listing all modules that accept this type of file as an input file parameter. Select the module or pipeline. GenePattern displays its parameters in the center pane, setting the input file parameter to the file of interest.
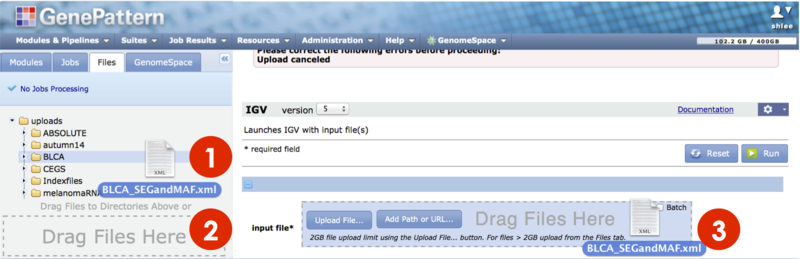
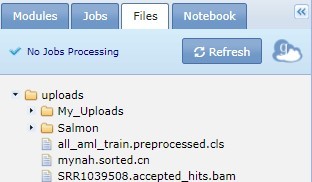
To upload files to your Files panel:
- Click the Files panel tab to bring it forward.
- Either drag and drop files from your computer to a folder (screenshot 1) or the Drag Files Here box (screenshot 2) to select the destination from a file manager.
- Or click on the destination folder and select Upload Files from the slide-out menu to select from a file manager.
- A progress bar tracks the upload and tells you when it is complete. Do not close the browser until the upload completes. Upload time depends on the size of your file, the speed of your network connection and a variety of other factors. GenePattern refreshes the page to reflect changes.
To create a new subdirectory in the Files panel:
- Click on the desired parent folder and select Create Subdirectory from the slide-out menu.
- Enter a name and click Create.
|
|
Add files to the applet window. Click the icon to display a file browser from which you can select files. Alternatively, drag-and-drop files directly onto the window. |
|
|
Remove files from the applet window. Click the icon to display a menu from which you can choose to delete selected, pending, finished, failed, or all files from the window. |
|
|
Pending. When you have added files to the window, but have not yet clicked Upload, the files are pending. |
|
|
Queued. When you click Upload, all pending files are added to the applet's upload queue. |
|
|
Finished. Files that have been successfully uploaded to the GenePattern server are marked as finished. |
|
|
Failed. Files that could not be uploaded to the GenePattern server are marked as failed. |
|
|
Upload. Start uploading all pending files. |


Deleting Uploaded Files
For that matter, delete any file in the Jobs, or Files panel by clicking on the file and selecting Delete File from the slide-out menu. Similarly, delete a group of files associated with a job by selecting Delete Job or a group of files in a subdirectory by selecting Delete Directory.
- When you delete a file, if a job or pipeline includes a pointer to the file, it can no longer find the file and therefore cannot be reloaded to run.
Special Considerations
- Disk space: Uploading files adds the files to your uploads directory on the server's file system. Your ability to add files to the file system is dependent on the space available and any quotas that may have been set by the server administrators. If you cannot upload files due to disk space, contact the server administrator. If you are using the GenePattern public server, contact us.
-
Partial uploads: If an upload fails to complete (because you stopped the upload or because of a server error or network interruption), you will see a message in the main panel highlighted in red. It is possible for a file to upload partially without indicating an error, especially for large files. Check that a file upload completed successfully by confirming the uploaded file size to the original. For Files panel files, hover your mouse over the file to see a tooltip element show the file size. For files within a job, load the Job Status page. File sizes are listed next to the files. To reload the file, delete the partially uploaded file and upload it again.
-
Duplicate names: The server prevents you from uploading multiple files with the same name. If two different files have the same name, rename the file before uploading it to GenePattern.
Using File Paths
Note: For security reasons, file paths are not enabled on the GenePattern public server.
When file paths are enabled on a GenePattern server, you can use file paths to identify input files for modules and pipelines. The GenePattern server can directly access the files stored on your local or networked drives; therefore, the files do not have to be transferred to or stored on the GenePattern server. Avoiding file transfers can save significant upload time and avoiding file storage can save significant amounts of disk space. Therefore:
- If you are running your own local server, we recommend that you use file paths rather than uploading files.
- If you are working with large files (2 GB or more), consider installing a local GenePattern server and enabling file paths on that server.
When file paths are enabled, the module/pipeline run page includes the Add Path or URL option. To use a file path as an input file parameter:
- Select a module or pipeline. The parameters appear in the center pane.
- Click the Add Path or URL button:
- Select a file from a local or networked drive and click Select.
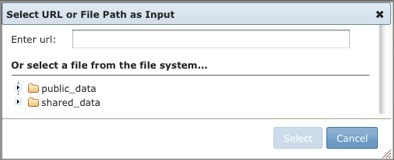
- GenePattern runs the analysis, using the file identified by the file path. The file path, rather than the file, is stored with the analysis results.
The Adminstrators Guide's Server File Paths section provides instructions on how to enable file paths on your GenePattern server.
Batch Processing
See the video tutorial: Batch Execution in GenePattern 3.3.3
Batch processing provides an automated method of running several files through a module or pipeline in parallel.
- Note that some modules by nature accept multiple files for an input parameter for a single job and in these cases, the job should remain unbatched.
- Batched processing, because it is available only for input file parameters, implies all other parameters are identically applied.
- To provide multiple input files for a module or pipeline, identify each set of files to be processed by giving them the same name (excluding file extension). For example, to run ComparativeMarkerSelection as a batch job, give each .gct or .res file the same name (excluding file extension) as its matching .cls file. For example: test1.gct, test1.cls, test2.gct, test2.cls. You can place all of the files in one subdirectory or create a separate subdirectory for each input file parameter (for example, one subdirectory for .gct files and another for .cls files). GenePattern processes each set of matching files, ignoring any other files in the directory.
To run a batch job after loading a module:
The key is to check the box labeled Batch, for the input parameter and then to supply the files containing the files, and to supply identically named sets if they are supplied for multiple parameters. GenePattern breaks down a submitted batched job into the multiple component jobs for you.
- As of GenePattern 3.8.0 you can drag in a list of files to batch over, or run over a directory, as before. For more information on dragged in lists, please see the 3.8.0 release notes.
To run a batch job for data files in a directory in the Files panel:
- Place the files to be processed in a folder in the Files panel as described in Uploading Files.
- Click on the folder and then select a module or pipeline to run from the slide-out menu. The module loads with the directory in the input field. Check the Batch box.
- Alternatively, load the module first, check Batch, and specify the subdirectory as an input file parameter for the module or pipeline.
- Click Run. GenePattern starts one analysis job for each input file or valid set of input files. It then displays all of the jobs in the Job Results Summary page.
Using a File Path Subdirectory
This applies to local GenePattern servers enabled to accept file paths. For more information, see Using File Paths.
- Verify that the files that you want to run as a batch are in a subdirectory accessible to your local GenePattern server.
- Select the module or pipeline to run. GenePattern displays the module run page.
- Check the Batch box for the input file you wish to provide a set of files for.
- For each input file parameter whose input files are in the subdirectory:
- Click the Add Path or URL button.
- Enter the file path of the subdirectory.
- Enter the remaining parameter values.
- Click Run.
Special Considerations
- Errors in batch submission: If an error occurs while submitting the batch job, GenePattern redisplays the module run page with an error message. Typical causes for errors include:
- Invalid input folder in batch. The folder is not found.
- Invalid input folder in batch. You do not have permission to read this folder.
- Invalid input folder in batch. The input folder contains no files.
- Invalid input folder in batch. The input folder contains no files which match the input parameter type.
- Sharing batch jobs: If you share a batch job with a non-administrator GenePattern user, that user can view the job status pages for the jobs but may not be able to view the input files or successfully reload and rerun the jobs. In particular, if you ran the batch job using an uploads subdirectory, the non-administrator user cannot access the files in your uploads directory and, therefore, cannot view the input files or successfully reload and rerun the jobs. If you ran the batch job using a file path subdirectory, whether the non-administrator user can access the files in that subdirectory determines whether the user can view the input files or successfully reload and rerun the jobs.
- Programming environments: GenePattern provides a programming interface (with versions for Java, R, and MATLAB) that allows you to submit jobs in parallel. For more information, see the Programmers Guide.
Working with Analysis Results
When you run a module or pipeline, GenePattern runs the analysis job on the GenePattern server. Analysis results are stored on the GenePattern server for a limited period of time. For the public server, this period is by default one week, after which jobs are deleted.
Basic Operations
The following table summarizes ways to work with analysis results:
|
Display analysis results |
Click a job ID number to display the Job Status page, which lists the input parameters and analysis results for that analysis job. Recent jobs are also listed on the Jobs panel. |
|
By default, analysis results are private. To share results with other GenePattern users, click the |
|
|
Save analysis results |
To save results persistently (beyond the period of time they are stored on the server), download the analysis result files to a more permanent location:
|
|
Delete analysis results |
If you no longer need your analysis results, you can delete the files from the server:
|
 icon on the Job Status page and modify settings.
Analysis Result Files
When you run a module or pipeline, the files generated by the module/pipeline are stored on the GenePattern server. The module author determines the content and format of the generated files; however, by convention, each module generates the following files:
- Analysis result files are typically formatted text files that contain the results of the analysis. Most analysis result files are intended to be used as input to subsequent analyses. Although these files can be viewed in a text viewer, the amount of information in the files may make them difficult to read.
If an analysis module generates an analysis result file that requires examination and interpretation, there is generally a corresponding visualization module that you can use to display the results. Visualization modules have “Viewer” in the title. For example:- Results from ComparativeMarkerSelection are viewed using the ComparativeMarkerSelectionViewer
- Results from modules in the Prediction category are viewed using the PredictionResultsViewer
- Results from SOMClustering are viewed using the SOMClusteringViewer
- Gene expression datasets are often viewed using the HeatMapViewer
- Large, integrated datasets are often viewed using Integrative Genomics Viewer (IGV) — a high-performance visualization tool that supports a wide variety of data types including sequence alignments, microarrays, and genomic annotations
.
Execution log files are text files that describe how the analysis was run. A module might generate one or more of the following log files: Log files can be viewed using a text viewer.- gp_task_execution_log.txt: contains the parameter values used to run the analysis, which is useful for reproducing analysis results.
- stdout.txt: contains "standard output" messages; that is, comments generated as the analysis module runs.
- stderr.txt: contains "standard error" messages; that is, information about errors (if any) that occurred during the analysis.
Job Status Page
When you run a module or pipeline, GenePattern sends the analysis job to the server and displays the Job Status page. This page displays complete information for an analysis job, including its status, input files, parameter values, and (when the job completes) result files. After starting an analysis, you can continue working. You do not have to leave the Job Status page displayed.
GenePattern offers several ways to redisplay a Job Status page:
- Click Modules & Pipelines to display the GenePattern home page, where your most recent jobs are listed in the Jobs panel. Click a job ID number to display the corresponding Job Status page.
- Click Job Results>Results Summary to display all of your analysis jobs. Click a job ID number to display the corresponding Job Status page.
- Enter the URL of the Job Status page in your browser: http://<server>/gp/pages/index.jsf?jobid=<job number>
On the GenePattern public server for example: https://cloud.genepattern.org/gp/pages/index.jsf?jobid=396741
On a local server for example: http://localhost:8080/gp/jobResults/111
An Email Reminder check box is visible while the job is running. For long running jobs, select the check box to have GenePattern send you email when the job completes. Continue working in GenePattern or exit from GenePattern. When you receive the email indicating that the job is finished, display the Job Status page to review the analysis results.
Job Results Summary Page
The GenePattern Jobs panel lists your most recent jobs. The Job Results Summary page lists all of your analysis jobs.
To display the Job Results Summary page, click Job Results>Results Summary. If a job is still running, refresh the page periodically to update its status.
To sort the job results, click a column header. You can sort jobs by status, job ID, module name, submission date, or completion date.
Sharing Analysis Results
When you run an analysis job, by default it is private; only you and GenePattern administrators can view or delete the job. Sharing job results gives other GenePattern users access to the job, including its input files, parameter values, and result files.
To share job results or modify the share status of a job:
- Display the Job Status page for the job. The share icon indicates whether the job is private
 or shared
  .
. - Click the share icon. GenePattern displays the share options for the job:
Modify the options by choosing which groups should have access and what access they should have.- Which groups have access. Jobs can be shared with all GenePattern users (Public) or groups of GenePattern users. You must be a member of group to share a job with that group; therefore, the options include only groups of which you are a member.
- What access. Groups can be given three levels of access: None, Read Only, Read and Write. Users with read access to a job can download it, rerun it, and view its input parameters, input files, and result files. Users with write access to a job can in addition delete the job or any of its result files.
- Click Update Settings to save your changes.
Sharing input files: In GenePattern, you can specify the output file from one analysis as the input file for a subsequent analysis. For example, you might use the output file from PreprocessDataset as the input file for ComparativeMarkerSelection. In this case, if you share the ComparativeMarkerSelection job, the other user can view the result files but cannot view the input file (which is from the PreprocessDataset job) or rerun the job. To share the ComparativeMarkerSelection job and its input file, either (1) share both the ComparativeMarkerSelection and PreprocessDataset jobs or (2) save the output file from PreprocessDataset, rerun ComparativeMarkerSelection using the saved file, and share the resulting ComparativeMarkerSelection job.
Creating groups: To create a group or add members to a group, contact the GenePattern administrator. If you are an administrator, see Creating Groups and Administrators for more information.
Starting Your Own GenePattern Server
We recommend using the GenePattern Public server, especially if you are new to GenePattern. The Public server is ready to use from a browser, analyzes your data on hosted servers, provides site support and offers a number of modules that are not available for local installation.
See the Servers section of the Concepts guide for background information.
Before you decide to install your own local server, please look over the Administrator's Guide.
Installing Your GenePattern Server
Download and follow instructions for your system on the GitHub Release page.
You use the same installation instructions regardless of whether you are installing a local GenePattern server for personal use or installing a networked server for use by an institution. The difference is in how you configure the server. If you are installing a local GenePattern server for personal use, the default server configuration is typically sufficient. If you are installing a networked server for use by an institution, see the Administrators Guide for instructions on how modify the default server configuration.
Working with Modules
Analysis and visualization modules are at the heart of GenePattern. Analysis modules provide computational methods and tools for gene expression analysis, proteomics data analysis, SNP analysis, RNA-seq analysis, flow cytometry, and data preprocessing and conversion. Visualization modules display your data and analysis results graphically. If you are unfamiliar with GenePattern modules and pipelines, see Concepts.
Basic Operations
The following table summarizes the different ways you can work with GenePattern modules.
|
Run a module |
Select a module, enter its parameters, and click Run. For more information, see Running Modules and Pipelines. |
|
Module properties include the author, the command line used to invoke the module, and the programs used to execute the module. If a module has an end-user license agreement associated with it, you can view the license via the module properties page. To display a module’s properties, click Modules & Pipelines and select the module. When GenePattern displays the module parameters, click Properties. |
|
|
Send module to other users |
Zip files provide a convenient way to send modules to other GenePattern users:
For more information, see Exporting and Installing Modules & Pipelines Using Zip Files. |
|
Install modules from the repository |
We maintain a repository of modules, pipelines, and suites. To install modules from the repository, click Modules & Pipelines>Install from Repository. For more information, see Installing Modules & Pipelines from the Repository. |
|
Create modules |
An analysis module invokes a program that executes the desired function. To create a module, you must write the program that implements the analysis and then create the GenePattern module that invokes that program. For more information, see Creating Modules. |
|
Edit modules |
You can edit a module that you have created or copy a public module and edit your copy of the public module. For more information, see Editing Modules. |
|
Delete modules |
To delete a module from your GenePattern server, click Modules & Pipelines>Manage. For more information, see Managing Modules & Pipelines. |
Displaying Module Properties
To view the definition of a module, display its properties:
- Load the module to display.
- Click the gear icon on the right and select Properties from the menu.GenePattern displays the module properties:
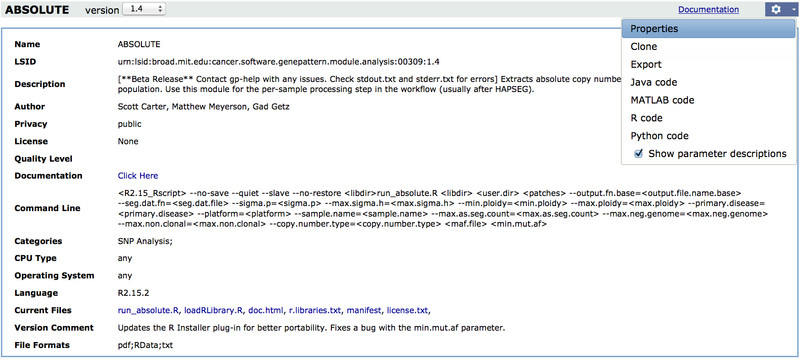
- Name. Name of the module.
- LSID. The Life Science Identifier (LSID) used to uniquely identify a GenePattern module.
- Description. Brief description of the module.
- Author. The author's name and affiliation (company or academic institution).
- License. The End-User license agreement for the module. (This is an optional property and will therefore usually be empty.)
- Privacy. Modules may be marked as public or private:
- Public modules may be accessed by anyone using the GenePattern server.
- Private modules may be accessed only by the person who installed or created the module (or by an administrator).
- Quality level. One of three terms that indicates the author’s confidence in the robustness of the module: development, preproduction, and production.
- Documentation. Help file that describes the module and provides instructions for its use.
- Command line. Command line used to launch the module. Values enclosed in angle brackets are replaced by specific values before the command executes.
- Categories. Category under which to list this module. Categories are used to organize modules and pipelines on the GenePattern home page. Pipelines are always assigned to the category name pipeline.
- CPU type. Indicates the type of CPU required to run the module, or any if the module runs on any type of CPU.
- Operating system. Indicates the operating system required to run the module, or any if the module runs on any operating system.
- Language. Indicates the programming language used to implement the module.
- min. language version. Indicates the version of the programming language used to implement the module.
- Version comment. Describes changes made to the module in this version.
- File format(s). Lists the file formats of any output files generated by the module.
- Current files: Lists the support files packaged with the module, such as executable programs, documentation, and so on.
- Parameters: Lists the module parameters, including the file formats of any input files required by the module.
Creating Modules
Only the GenePattern team can create, edit, or install modules on the GenePattern public server. Therefore, to create a module, you must have a local GenePattern server installed (see Starting Your Own GenePattern Server).
Creating a GenePattern module is a two-step process:
- Find or write a program that executes the desired function. Any program that can be executed from the command line can be run as a GenePattern module. If you are writing the program, you can use any programming language. For example, you can use a compiled language, such as C, to create an executable or use a scripting language, such as Perl, to create a script that is run by an interpreter. The Programmers Guide provides guidelines for writing programs that will be run as GenePattern modules.
- Use GenePattern to create a module that invokes the program that you have written. It takes just a few minutes to enter the necessary information. Once you have done so, you can run the module. You can decide which parameters from the algorithm to expose to the user and can replace command line parameter names that are hard to remember with names that are self-explanatory. You can also create drop-down list choices for parameters to reduce the possibility of invoking the module with incorrect values.
To create a module that invokes the program that you have written (or otherwise obtained):
- Click Modules & Pipelines>New Module. GenePattern displays the module integrator.
- Define the module.
- Click Save to create the module.
For more information about creating modules and using the module integrator, see the Programmers Guide.
Editing Modules
Only the GenePattern team can create, edit, or install modules on the GenePattern public server. Therefore, to edit a module, you must have a local GenePattern server installed (see Starting Your Own GenePattern Server).
To edit a module:
- Click Modules & Pipelines to display the GenePattern home page.
- Display the module properties page in one of the following ways:
- Select a module that you created. When GenePattern displays the module parameters, click Edit. GenePattern displays the module integrator.
- Select a public module. When GenePattern displays the module parameters, click Properties. When GenePattern displays the module properties, click Clone to create a copy of the module. You created the copy, so you can edit it.
- Edit the module.
- Click Save to create a new version of the module.
For more information about editing modules and using the module integrator, see the Programmers Guide.
Working with Pipelines
A GenePattern pipeline defines a sequential series of modules to be run. Modules run from a pipeline work exactly the same as those run directly from GenePattern. If you are unfamiliar with GenePattern pipelines, see Concepts.
Basic Operations
The following table summarizes the different ways you can work with GenePattern pipelines.
|
Run a pipeline |
Select a pipeline, enter its parameters, and click Run. For more information, see Running Modules and Pipelines. |
|
Pipeline properties include the pipeline’s author, the modules to be run and their parameters. If a pipeline has an end-user license agreement associated with it, you can view the license via the pipeline properties page. To display pipeline properties, click Modules & Pipelines, select the pipeline, and click Properties. |
|
|
Send pipelines to other users |
Zip files provide a convenient way to send pipelines to other GenePattern users.
For more information, see Exporting and Installing Modules & Pipelines Using Zip Files. |
|
Install pipelines from the repository |
We maintain a repository of modules, pipelines, and suites. To install pipelines from the repository, click Modules & Pipelines>Install from Repository. For more information, see Installing Modules & Pipelines from the Repository. |
|
Create pipelines |
You can create an empty pipeline and add modules to it, create a pipeline by cloning an existing pipeline, or start with an analysis result file and have GenePattern create a pipeline that recreates that analysis result file. For more information, see Creating Pipelines. |
|
Edit pipelines |
You can edit a pipeline that you have created or clone a public pipeline and edit your copy of the public pipeline. For more information, see Editing Pipelines. |
|
Delete pipelines |
To delete a pipeline, click Modules & Pipelines>Manage. For more information, see Managing Modules & Pipelines. |
Displaying Pipeline Properties
To view the definition of a pipeline, display its properties:
- Click Modules & Pipelines to display the GenePattern home page.
- Select the pipeline to display.
- When GenePattern displays the pipeline parameters (if any), click Properties. GenePattern displays the pipeline properties:
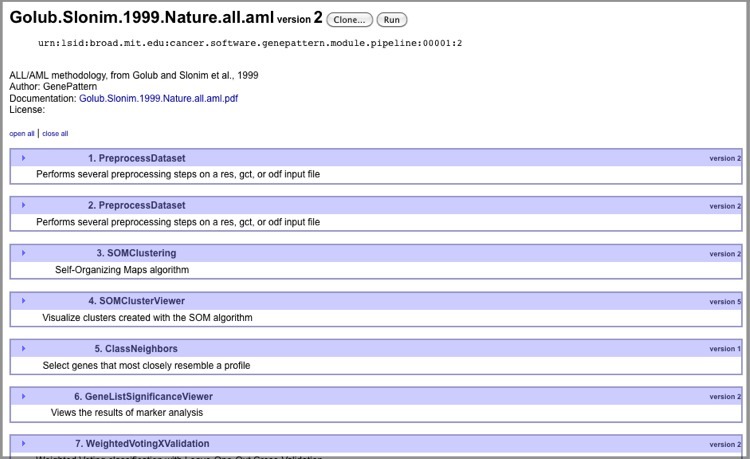
On this page, you can:
- Click open all and close all to show and hide all module parameters.
- Click the arrow icon next to a module to show/hide its parameters.
- Click Clone to create your own copy of this pipeline, which you can then edit.
- Click Run to run the pipeline.
- Click Edit to edit the pipeline. The Edit button, not shown here, is only available for pipelines that you have created.
Creating Pipelines
You can create a pipeline in several ways: from an analysis result file, from an existing pipeline, or from scratch (beginning with an empty pipeline).
To create a pipeline from an analysis result file:
- Click the
 menu icon next to the analysis result file and select Create Pipeline. GenePattern creates a pipeline that will reproduce the analysis results file and opens the pipeline designer for that pipeline.
GenePattern adds modules to the pipeline based on the following logic: add the module that created the result file; check the module’s input file parameters; if the input file for the module was the output file of a previous module, add the previous module; check that module’s input file parameters; continue to walk back through the chain of modules, adding modules to the pipeline, until reaching the initial input file.
- Edit the pipeline as desired. For more information, see Pipeline Designer.
- Click Save to create the pipeline.
To create a new copy of an existing pipeline:
- Click Modules & Pipelines and select the pipeline. GenePattern displays the pipeline parameters (if any).
- Click Properties. GenePattern displays the pipeline definition page.
- Click Clone to create a copy of the pipeline. GenePattern prompts you to name the new pipeline.
- Enter a name for the pipeline and click OK. GenePattern displays the pipeline properties for the new pipeline.
- Click Edit to edit pipeline. GenePattern displays the pipeline designer.
- Edit the pipeline as desired. For more information, see Pipeline Designer.
- Click Save to create the pipeline.
To create a pipeline from scratch:
- Click Modules & Pipelines>New Pipeline. GenePattern displays the pipeline designer.
- Edit the pipeline as desired. For more information, see Pipeline Designer.
- Click Save to create the pipeline.
Editing Pipelines
To edit a pipeline:
- Click Modules & Pipelines to display the GenePattern home page.
- Select the pipeline that you want to edit. GenePattern displays the pipeline parameters (if any).
- Open the pipeline designer in one of two ways:
- Click Edit, if it is available. GenePattern displays the pipeline designer.
This option is visible only if you created this pipeline on this GenePattern server. - Otherwise, create a copy of the pipeline to edit:
1. Click Properties. GenePattern displays the pipeline properties.
2. Click Clone. GenePattern prompts you to name the new pipeline.
3. Enter a name for the pipeline and click OK. GenePattern displays the pipeline properties for the new pipeline.
4. Click Edit. GenePattern displays the pipeline designer.
- Click Edit, if it is available. GenePattern displays the pipeline designer.
- Edit the pipeline as desired. For more information, see Pipeline Designer.
- Click Save to save the pipeline.
Pipeline Designer
See the video tutorial: Exploring the New GenePattern Pipeline Designer.
When you create or edit a pipeline, GenePattern displays the pipeline designer:

From left to right:
- Module selection panel. Use this panel to add a module or a file to the pipeline.
- Pipeline diagram. The center panel displays the pipeline diagram. It shows each module in the pipeline, as well as any input files included in the pipeline. Connections between the modules show the flow of data through the pipeline. Use the diagram to reposition modules/files and to add connections between modules/files.
- Editing panel. Use the editing panel to view and edit basic pipeline properties (as shown here) or the properties of the object selected in the diagram.
The pipeline diagram toolbar provides the following options:
 |
Displays the basic pipeline properties in the Editing Pipeline panel, as shown here. For more information, see Editing Basic Pipeline Properties. |
 |
Saves your changes without closing the designer. |
 |
Saves your changes, closes the designer and runs the pipeline. |
 |
Loads the last saved version of the pipeline, overwriting any unsaved changes. |
 |
Displays this section of the GenePattern documentation. |
The remaining topics in this section describe how to use the pipeline designer:
Editing Basic Pipeline Properties
To edit basic pipeline properties:
- Click the Edit Properties icon to display the basic pipeline properties in the editing panel.
- Edit the pipeline properties.
- Click Save or Save & Run to save your changes.
The Editing Pipeline panel displays the following properties:
- Version: At the top right is a drop-down list of versions. By default, you are editing the most recent version of the pipeline. To edit a different version, select that version from the drop-down list.
Editing a pipeline creates a new version of the pipeline; it does not change the existing version of the pipeline. - LSID: The Life Science Identifiers (LSIDs) for this pipeline. You cannot create or edit LSIDs. The GenePattern server automatically assigns an LSID to each version of a pipeline.
- Pipeline Name: The name of the pipeline. When naming pipelines, note the following:
- Pipeline names can include alphanumeric characters, periods (.), and underscores (_).
- Pipeline names must not include spaces or special characters such as: exclamation points (!), at signs (@), pound signs (#), dollar signs ($), percent signs (%), carets (^), ampersands (&), and asterisks (*).
- For cross-platform compatibility, avoid the following names: con, prn, aux, nul, com1, com2, com3, com4, lpt1, lpt2, and lpt3. Machines running Windows cannot accept files with these names, regardless of the file extension.
- GenePattern does not prevent you from using the same name for multiple pipelines; however, using unique names is strongly recommended.
- Categories: Semicolon separated list of tags for the pipeline.
- Description: A brief description of the pipeline, which is displayed when a user runs the pipeline or views the pipeline definition.
- Author: The author's name and affiliation (company or academic institution); ideally, the author's e-mail. If you make this pipeline public, the author field allows other users to credit the author and to contact the author with questions, suggestions, or enhancement ideas.
- Privacy: The option to make a pipeline public is limited to authorized users. Select Private (default) or Public. A private pipeline can be accessed only by the person who created or installed the pipeline (or by an administrator); a public pipeline can be seen and run by all users.
- Version Comment: A brief description of this version. When GenePattern clients display a drop-down list of versions, the comments for each version are visible in the drop-down list.
- Documentation: Documentation is strongly encouraged for public pipelines. As a GenePattern user, when you select a pipeline, GenePattern displays a form that includes the pipeline parameters and a Documentation button. When you click Documentation, GenePattern displays the pipeline documentation. If no documentation file was provided, GenePattern displays a message indicating that no information is available.
To supply a help file, click Attach Documentation and select a (previously created) documentation file. GenePattern uploads the documentation file to the server and displays its name in the pipeline properties panel. Only one help file can be attached to the pipeline. To select a different file, click Attach Documentation.
-
License: To supply a text file containing an end user license agreement to the pipeline, click Attach License. Anyone using the pipeline will be prompted to accept or decline the license terms when they first run the pipeline, and their acceptance will be tracked in our. They will not have to accept the terms again unless and until a new version of the pipeline is created. Only one license file can be attached to the pipeline. To select a different license file, click Attach License. This is an optional property; as such it will often be empty.
-
Prompt When Run: Most modules in a pipeline have one or more parameters. You can supply values for these parameters or mark them as prompt-when-run. When the pipeline runs, GenePattern prompts the user for all prompt-when-run parameters. By default, GenePattern prompts the user for a parameter by displaying its name and description. Optionally, you can supply alternate text for the prompt. Click Display Prompt When Runs to view all prompt-when-run parameters in the pipeline and, optionally, modify the prompt text.
Adding Modules/Files
To add a module to the pipeline:
- Select the module from the list on the left. The designer adds the module to the diagram.
Tip: You can select a module in one of two ways:- Locate the module in the list and click on it.
- Start typing the module name in the search box. GenePattern displays module names that include the typed characters. Click the desired module and then click Add.
- Drag the module to the desired location.
Tip: The diagram is read from left to right and from top to bottom, as you would read a book written in English. - Click the module to view and edit its properties in the editing panel.
- Click Save or Save & Run to save your changes.
Note: If you add a module with an end-user license to your pipeline, users who have not accepted that module's license terms will be presented with a license-acceptance window before the pipeline will run.
To specify a file as input to a module in the pipeline, you must first add the file to the pipeline diagram. To add a file to the diagram:
- Click Attach File. GenePattern prompts you for the file.
- Browse for a file. GenePattern adds the file to the diagram.
- Drag the file to the desired location. You can now use this file as an input file for one or more modules.
- Click Save or Save & Run to save your changes.
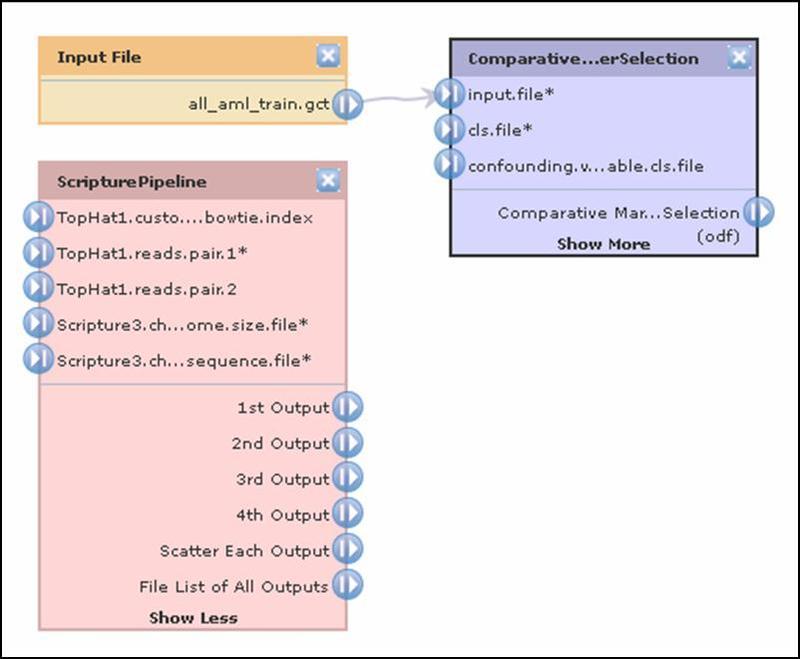
The pipeline diagram uses color to distinguish between files (orange), modules (purple), and pipelines (red). Connections between objects show the flow of data through the pipeline. The following diagram shows a file, a module and a pipeline. The file (all_aml_train.gct) is used as an input file parameter (input.file) for the module. To delete an object and all of its connection, click its ![]() delete icon.
delete icon.
Editing Module Properties
To edit a module's properties:
- Click the module in the pipeline diagram. GenePattern displays its properties in the editing panel.
- Edit the properties, as shown below.
- Click Save or Save & Run to save your changes.
|
By default, a pipeline runs the most recent version of a module. The drop-down list shows all versions of the module that are installed on the GenePattern server. To have the pipeline run a different version of the module, select it from the list. |
|
The Life Science Identifier (LSID) for this module. You cannot create or edit LSIDs. The GenePattern server automatically assigns an LSID to each version of a module. |
|
Click the Documentation button to display the module documentation. |
|
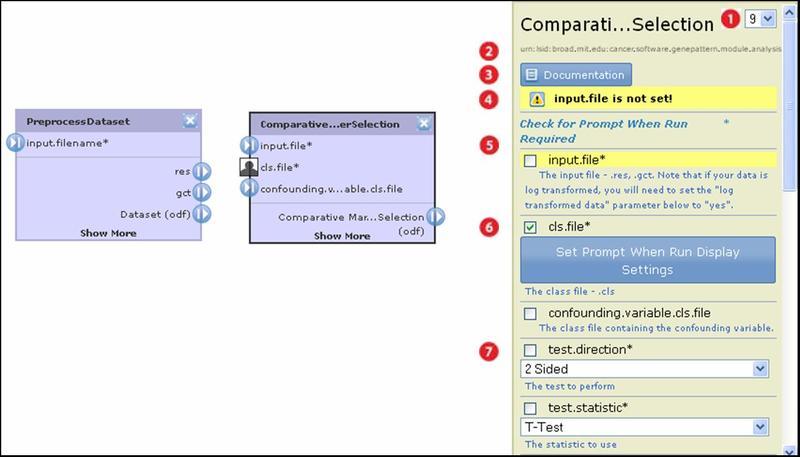
Warnings shown here must be addressed before you can save the pipeline. GenePattern highlights all parameters affected by the warnings. |
|
All module parameters are listed here. Input file parameters are critical and are generally listed first. They control the flow of data through the pipeline. For more information, see Setting Input File Parameters. |
 |
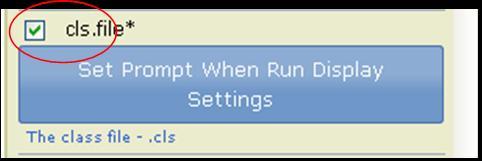
Click the check box next to a parameter to mark it prompt-when-run. When the pipeline runs, GenePattern prompts the user for all prompt-when-run parameters in the pipeline. By default, GenePattern prompts the user for a parameter by displaying its name and description. Optionally, click Set Prompt When Run Display Settings to supply alternate text for the prompt. |
 |
For most parameters, you enter a value, select a value from a drop-down list, or use the default value supplied by GenePattern. |
Setting Input File Parameters
In the pipeline diagram, the connections between modules show the flow of data through the pipeline. You modify the flow of data by modifying the input file parameters. The connections in the diagram are a graphical representation of the input file parameter settings. When you click on the module, the editing panel provides a textual representation of the same input file parameter settings.
You can supply the file for an input file parameter in one of three ways:
- Use the output file generated from another module as the input file.
- Prompt the user to provide an input file.
- Specify a file as the input file.
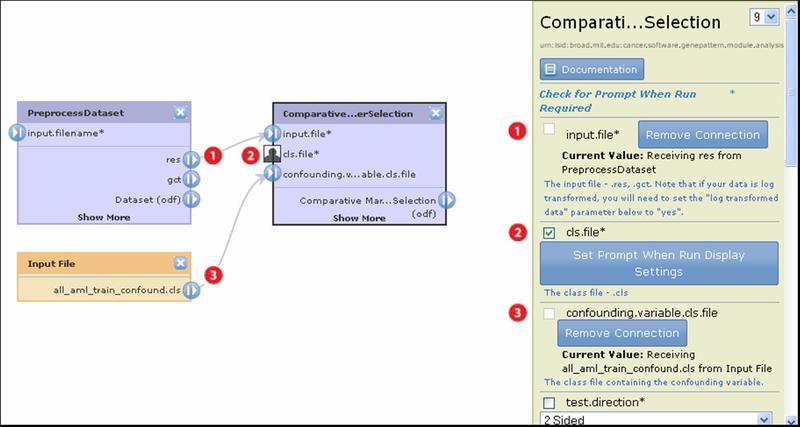
The following pipeline diagram uses the ComparativeMarkerSelection module to illustrate the different ways of supplying input file parameters:
|
For the input.file parameter, use the output file generated by the PreprocessDataset module.
|
|
For the cls.file parameter, prompt the user for input.
|
|
For the confounding.variable.cls.file, specify the file all_aml_train_confound.cls.
|
 to indicate that the cls.file parameter has been marked prompt-when-run.
The method you use to set the input file parameter depends on how you plan to supply the file:
- To use the output file generated from another module as the input file, click and drag from the generated file (res output of PreprocessDataset) to the input file parameter (input.file parameter of ComparativeMarkerSelection). Tip: When drawing a connection, click and drag from the output icon
 to the input icon
  .
. - To prompt the user to provide the input file, use either the diagram or editing panel to mark the input file parameter (cls.file) as a prompt-when-run parameter. If the input file parameter already has a connection (that is, you have already specified a file for this parameter), you must delete the connection before you can mark it as a prompt-when-run parameter.
- Diagram: Click the input icon of the input file parameter. When GenePattern displays the Choose Action window, click Prompt When Run.
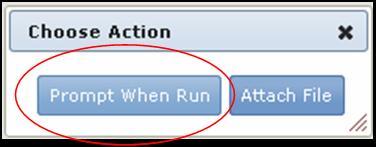
- Editing panel: Click the check box next to the parameter to mark it as prompt-when-run.
- Diagram: Click the input icon
- To specify a file as the input file, you must first attach the file to the pipeline diagram:
- If you have already attached the file to the pipeline diagram (see Adding Modules/Files), click and drag from the attached file (all_aml_train_confound.cls) to the input file parameter (all_aml_train_confound.cls parameter of ComparativeMarkerSelection).
- If you have not yet attached the file the pipeline diagram, click the input icon of the input file parameter. When GenePattern displays the Choose Action window, click Attach File. GenePattern prompts you for a file and you browse for the file. GenePattern then adds the file to the diagram and draws the connection from the attached file (all_aml_train_confound.cls) to the input file parameter (all_aml_train_confound.cls parameter of ComparativeMarkerSelection).
Click Save or Save & Run to save your changes.
Reusing a user-supplied file
Occasionally, a pipeline requires that the same input file be specified for multiple parameters. For example, consider a pipeline with two modules:
- ComparativeMarkerSelection, with parameters input.file (an expression dataset file) and cls.file (a class file).
- ExtractComparativeMarkerResults, with parameters comparative.marker.selection.filename (ComparativeMarkerSelection result file) and dataset.filename (the expression dataset file used for ComparativeMarkerSelection).
You want to use the same input file for both the ComparativeMarkerSelection.input.file parameter and the ExtractComparativeMarkerResults.dataset.filename parameter. If the input file that you want to use is either the output file generated from another module (perhaps an expression dataset generated by the PreprocessDataset module) or an uploaded file, this is not a problem. You can connect the file that you want to use to both the ComparativeMarkerSelection.input.file parameter and the ExtractComparativeMarkerResults.dataset.filename parameter.
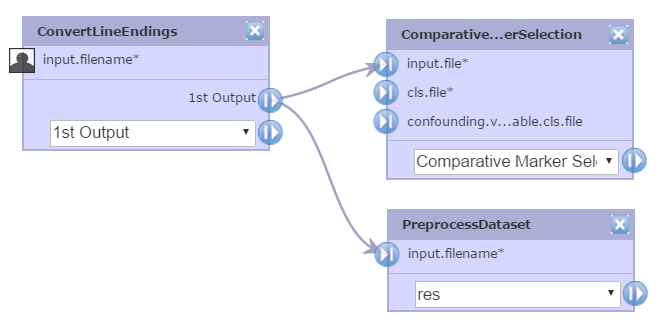
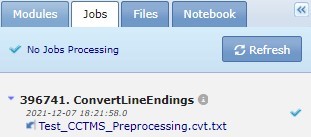
However, what happens if you want to prompt the user for the expression dataset file? If you mark the ComparativeMarkerSelection.input.file parameter as a prompt-when-run parameter, you still need an input file for ExtractComparativeMarkerResults.dataset.filename parameter. If you mark both parameters as prompt-when-run, you have to rely on your user to submit the same expression dataset file for both parameters. The workaround is to add the ConvertLineEndings module to your pipeline:
- Add ConvertLineEndings to your pipeline.
- Mark the ConvertLineEndings.input.filename parameter as prompt-when-run. ConvertLineEndings generates an output file almost identical to the input file; it simply converts the line endings in the file to those used by perl on the host operating system.
- Use the output file generated by ConvertLineEndings as the input file for both the ComparativeMarkerSelection.input.file parameter and the ExtractComparativeMarkerResults.dataset.filename parameter.
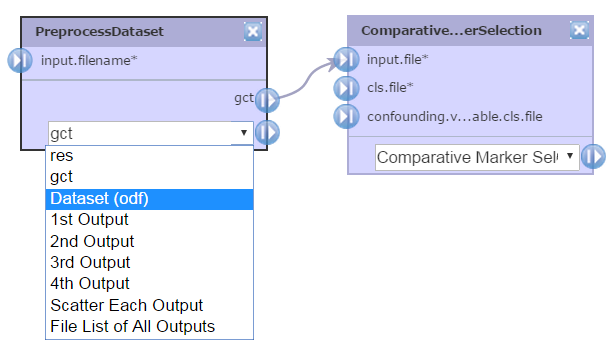
If a module generates multiple output files, you can select the type of output file you want by using the drop-down menu and choosing the output file, e.g. ODF, then clicking the |> symbol to drag it to an input file parameter. Use the drop-down menu again to choose a different file type and connect it to a different module.
Reordering Modules
GenePattern orders modules in a pipeline based on their position in the diagram. The diagram is read from left to right and top to bottom, as you would read a book written in English.
You can reorder the modules in a pipeline by repositioning the modules in the diagram. Similarly, you can insert a module into a pipeline simply by adding it to the diagram and dragging it to the appropriate location. However, in either case, you are changing the flow of the data and, therefore, must delete and recreate any affected connections.
To reposition a module in the pipeline:
- Remove its connections to other modules.
- Drag the module to its new position.
- Recreate connections as needed to reflect the flow of data through the modified pipeline.
Working with Suites
GenePattern includes close to 200 analysis and visualization modules, and the list is constantly growing. With so many modules, it's helpful to have shortcuts for finding your favorites. Suites can help you organize modules in much the same way playlists help you organize music. Each suite is a themed collection of user-selected modules. You can create as many suites as you like. The GenePattern team has created several suites, which are included on the GenePattern public server. For example, the ClusteringSuite contains the HierachicalClustering, KMeansClustering, and SOMClustering modules. If you are unfamiliar with GenePattern suites, see Concepts.
Suites Menu
Click Suites>Manage to display the currently installed suites:
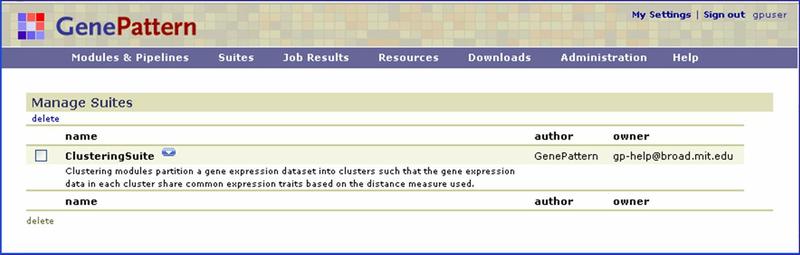
Click the ![]() icon next to the suite name to display a menu of commands for working with that suite.
icon next to the suite name to display a menu of commands for working with that suite.
|
Edit |
Available only for suites that you have created. Display the Edit GenePattern Suite page, which you can use to modify your suite. |
|
Delete |
Delete the suite from the GenePattern server. |
|
Export excluding dependents |
Create a ZIP file that contains the definition of the suite, but not the modules or pipelines in the suite. The ZIP file can be used to install the suite on another GenePattern server. Installing the suite from this ZIP file will not install any modules or pipelines in the suite; they must already be installed on the GenePattern server or be installed separately. |
|
Export including dependents |
Create a ZIP file that contains the definition of the suite, as well as the modules and/or pipelines in the suite. The ZIP file can be used to install the suite on another GenePattern server. Installing the suite from this ZIP file will also install the modules and pipelines in the suite (unless they are already installed on the GenePattern server). |
Basic Operations
The following table summarizes the different ways you can work with GenePattern suites.
|
To display the suite definition:
|
|
|
Send suites to other users |
Zip files provide a convenient way to send suites to other GenePattern users.
For more information, see Exporting and Installing Suites Using Zip Files. |
|
Install suites from the repository |
We maintain a repository of modules, pipelines, and suites. To install suites from the repository, click Suites>Install from Repository. For more information, see Installing Suites from the Repository. |
|
Create suites |
To create a suite, click Suites>New. For more information, see Creating Suites. |
|
Edit suites |
You can edit a suite that you have created or copy a public suite and edit your copy of the public suite. For more information, see Editing Suites. |
|
Delete suites |
To delete a suite from your GenePattern server, click Suites>Manage. For more information, see Managing Suites. |
Displaying Suite Definitions
To display the definition of a suite:
- Click Suites>Manage.
- Click the name of the suite that you want to display. GenePattern displays the suite definition:
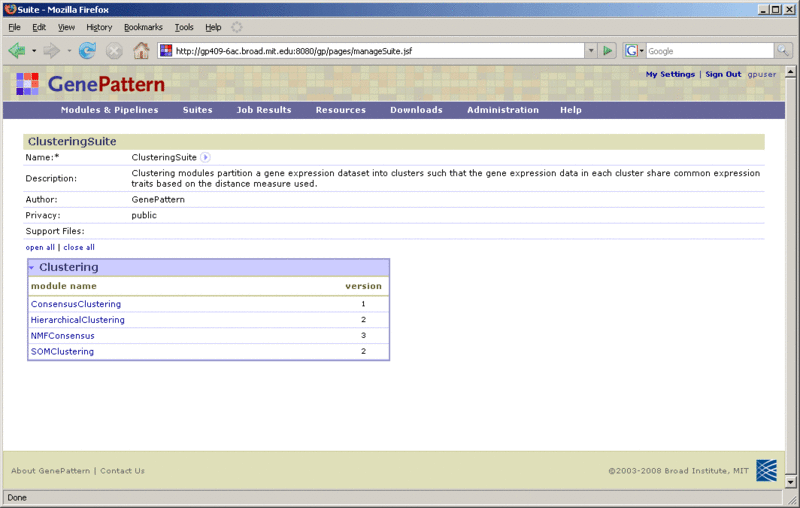
- Name: The name of the suite.
- Description: A brief description of the suite.
- Author: The author's name and affiliation (company or academic institution). This is a comment-only field.
- Privacy: Select Private (default) or Public. A private suite may be accessed only by the person who created or installed the suite (or by an administrator); a public suite can be accessed by all users of this GenePattern server.
- Support files: Any files included with the suite. Public suites generally include documentation.
- Modules & Pipelines: The remainder of the definition form lists all of the modules and pipelines that are on your GenePattern server by category. The ClusteringSuite in this figure contains modules from only one category, the Clustering category.
From this page, you can:
- Click the menu icon next to the suite name to display the suite menu.
- Click open all and close all to show and hide the modules and pipelines in all categories.
- Click the arrow icon next to a category to show/hide the modules and pipelines in that category.
Creating Suites
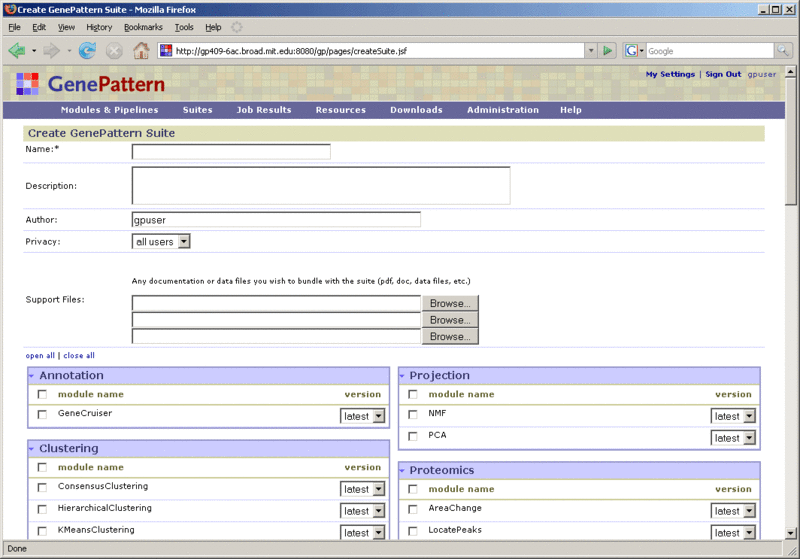
To create a suite:
- Click Suites>New. GenePattern displays an empty suite definition form.
- Define the suite by entering values for each field. For descriptions of these fields, see Displaying Suite Definitions.
- To add modules and pipelines to the suite:
- Select the check box next to a module/pipeline to add that module/pipeline to the suite.
- Select the check box next to a category name to add all modules and pipelines in that category to the suite.
- Click Save. GenePattern creates the suite.
Editing Suites
To view or edit a suite:
- Click Suites>Manage. GenePattern displays the Manage Suites page, which lists the suites on your GenePattern server.
- To view the suite definition, click the suite name.
- To edit the suite definition:
- Click the menu icon next to the suite name and select Edit. This option is available only if you created the suite.
- Edit the suite definition.
- Click Save to update the suite definition.
- Click the
Managing Modules, Pipelines, and Suites
An analysis module runs a single analysis. A pipeline runs a series of analysis modules. Suites group modules and pipelines into packages that have related functionality, which helps you to organize and work with modules and pipelines. If you are unfamiliar with GenePattern modules, pipelines, and suites, see Concepts.
Three different GenePattern pages on modules selectively list modules and pipelines based on the source. These sources include the production repository, from zip files, and created on the server. Certain modules on the production repository, e.g. MutSigCV and Birdseed, are currently only available from the public server. The latter is noted on the Modules page discussed next.
(1) The Modules page, accessible from the menubar item Modules or this link: <https://genepattern.org/modules> provides links to module and pipeline documentation and lists modules and pipelines.
(2) A server's Manage page. For a complete list of modules and pipelines available and their source, sign into the specific public or local GenePattern server and select from the menubar Modules & Pipelines>Manage. You may need to check the box labeled show everyone’s modules. This list includes all versions of a module and version comments. Version comments are also at the bottom of a module’s documentation as described in Version Numbers in the Concepts guide.
(3) A local server's Install page, accessed from the menubar's Modules & Pipelines>Install From Repository or this link: <http://127.0.0.1:8080/gp/pages/taskCatalog.jsf>. From the drop-down menu at top, select from the available repositories to display modules available for installation.
Installing Modules & Pipelines from the Repository
We maintain a repository of modules and pipelines that are freely available to the public. Most of these modules and pipelines are available on the GenePattern public server. To install these modules and pipelines on your local GenePattern server:
- Click Modules & Pipelines>Install from Repository. GenePattern displays the Install Modules & Pipelines from Repository page, as shown below.
- Select the repository from which you want to install. By default, the Production Repository is displayed.
- Select the modules and pipelines to install. Filtering Options are described below.
- Click Install Checked
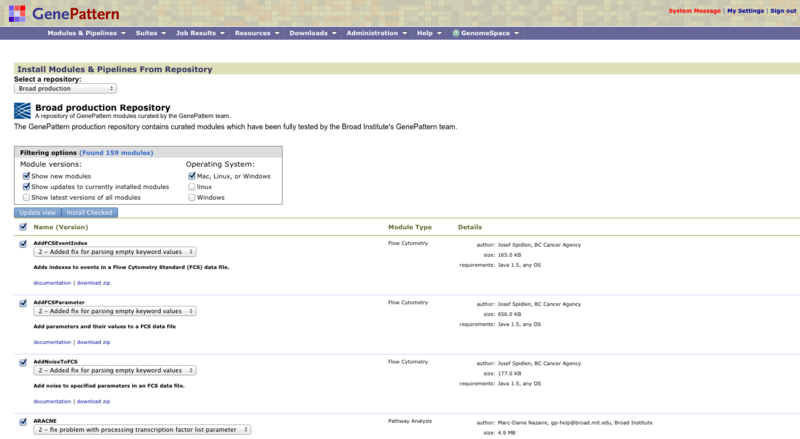
Use the top section of the form to find the modules to install. To update the list of modules/pipelines, select the modules/pipelines to search for and click Update View:
-
Show new modules: Displays modules and pipelines that are in the repository and not on your server.
-
Show updates to currently installed modules: Displays modules and pipelines where the repository contains a more recent version than the version installed on your server.
-
Show latest versions of all modules: Displays all modules and pipelines in the repository, whether or not they are installed on your server.
-
Operating system: Filters the search results to display only modules and pipelines that run the selected operating system platform(s).
Note: To install an older version of a module already installed on your server, check the "Show latest versions of all modules" box under Filtering Options, then Update View. This will show all modules in the repository. The checkbox underneath Update View and next to "Name (Version)" allows you to select/deselect all modules in the displayed list. Then you can use the dropdown under the module to select the version you wish to install.
For each module and pipeline, GenePattern displays similar information:
- In the Name (Version) column:
- Module/pipeline name.
- Drop-down list of available versions. By default, the most recent version is selected.
- Brief description of the module/pipeline.
- documentation link, which displays the module/pipeline documentation.
- download zip link, which downloads a zip file of the module/pipeline. Downloading the zip file allows you to examine the source files before installing them on your server. You can then install the module/pipeline from the zip file, as described in Exporting and Installing Suites Using Zip Files.
- In the Module type column, the category label assigned to the module/pipeline.
- In the Details column, the author, size, and operating system requirements for the module/pipeline.
Exporting and Installing Modules & Pipelines Using Zip Files
Zip files provide a convenient means of sending your modules and pipelines to other GenePattern users. You can export a module or pipeline to a zip file. The zip file can then be used to install the module or pipeline on another GenePattern server.
To export a module or pipeline to a zip file:
- Click Modules & Pipelines to display the GenePattern home page.
- In the Modules & Pipelines pane, select the module or pipeline to export. GenePattern displays the analysis parameters (if any).
- Click the gear icon in the upper right corner of the module page, then select Export.
- If you are exporting a pipeline, GenePattern displays the following dialog:
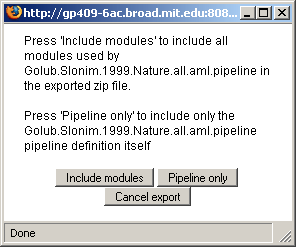
- Click Include modules to create a zip file that includes all modules in the pipeline.
- Click Pipeline only to create a zip file that contains only the pipeline definition. (If you install a pipeline without installing the modules that it uses, when you run the pipeline, GenePattern lists the missing modules and prompts you to edit the pipeline or install the modules.)
- GenePattern creates a zip file that contains the module/pipeline and prompts you to save the file to your local drive.
To install a module or pipeline from a zip file:
- Click Modules & Pipelines>Install from zip. GenePattern displays the Install Modules & Pipelines page, as shown below.
- Select the file to install in one of two ways:
- To select a zip file from a directory, click Browse.
- To select a zip file from a web site, enter the URL for the zip file.
- Use the Visible to radio buttons to select a private or public installation:
- Your user name: Choose this option for a private installation. Only you (or an administrator) can view and run the module/pipeline.
- All users (default): Choose this option for public installation. Any user connected to this server can view or run the module/pipeline.
- Click Install.

Managing Modules & Pipelines
Click Modules & Pipelines>Manage to display the Manage Modules & Pipelines page. From this page, you can
- View the modules/pipelines installed on your GenePattern server. To display only your own modules/pipelines, clear the show everyone’s modules check box. To display all modules/pipelines, select the check box. Private modules owned by other users are not visible unless you are an administrator.
- View the module/pipeline sources - which repository they were installed from, if they were created on the server, or uploaded as a .zip.
- Delete modules/pipelines from your GenePattern server.
Note: If the check box next to the module/pipeline is grayed out, you cannot delete it. Typically, this occurs when the module/pipeline is used by another module, pipeline, or suite. To delete the module/pipeline, you must first delete the module, pipeline, or suite that uses it or remove it from that module, pipeline, or suite.
Installing Suites from the Repository
We maintain a repository of suites that are freely available to the public. To install these suites on your GenePattern server:
- Click Suites>Install from Repository. GenePattern displays the Install Suites from Repository page, as shown below.
- Select the suites to install.
Installing a suite installs its modules, if they are not yet installed on the server. - Click Install Checked.
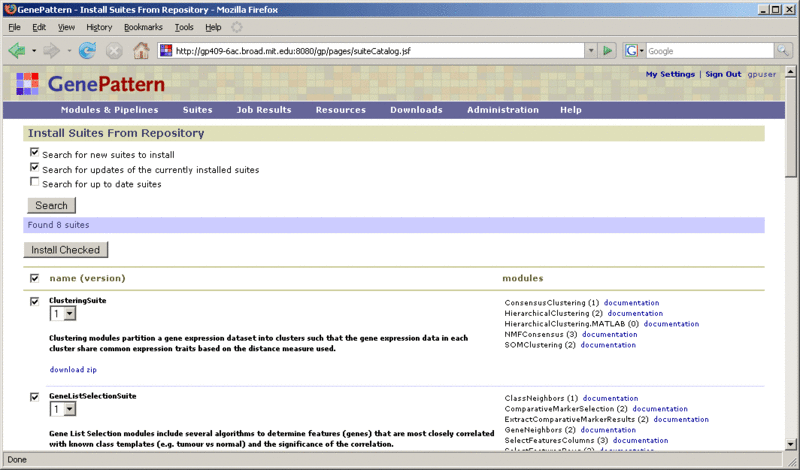
Use the top section of the form to find the suites to install. To update the list of suites, select the suites to search for and click Search:
- Search for new suites to install: Displays suites that are in the repository and not on your server.
- Search for updates of the currently installed suites: Displays suites where the repository contains a more recent version than the version installed on your server.
- Search for up to date suites: Displays suites where the repository contains versions not installed on your server.
For each suite, GenePattern displays similar information:
- In the Name (Version) column:
- Suite name. Click the menu icon next to the name to display the suites menu.
- Drop-down list of available versions. By default, the most recent version is selected.
- One-line description of the suite.
- download zip link, which downloads a zip file of the suite. Downloading the zip file allows you to examine the source files before installing them on your server. You can then install the suite from the zip file, as described in Exporting and Installing Suites Using Zip Files.
- Suite name. Click the
- In the Modules column, a list of the modules and pipelines in the suite.
Exporting and Installing Suites Using Zip Files
Zip files provide a convenient means of sending your suites to other GenePattern users. You can export a suite to a zip file. The zip file can then be used to install the suite on another GenePattern server.
To export a suite to a zip file:
- Click Suites>Manage.
- Click the menu icon following the name of the suite that you want to export. GenePattern displays the suite menu.
- Click one of the following:
- Export excluding dependents: Creates a zip file that contains the definition of the suite, but not the modules or pipelines in the suite. Installing the suite from this zip file will not install any modules or pipelines in the suite; they must already be installed on the GenePattern server or be installed separately.
- Export Including dependents: Creates a zip file that contains the definition of the suite, as well as the modules and/or pipelines in the suite. Installing the suite from this zip file will also install the modules and pipelines in the suite (unless they are already installed on the GenePattern server).
To install a suite from a zip file:
- Click Suites>Install from zip.
- Select the file to install. You can identify the zip file using a file specification or a URL.
- Use the Visible to radio buttons to select a private or public installation:
- Your user name: Choose this option for a private installation. Only you (or an administrator) can view and run the module/pipeline.
- All users (default): Choose this option for public installation. Any user connected to this server can view or run the module/pipeline.
- Click Install.
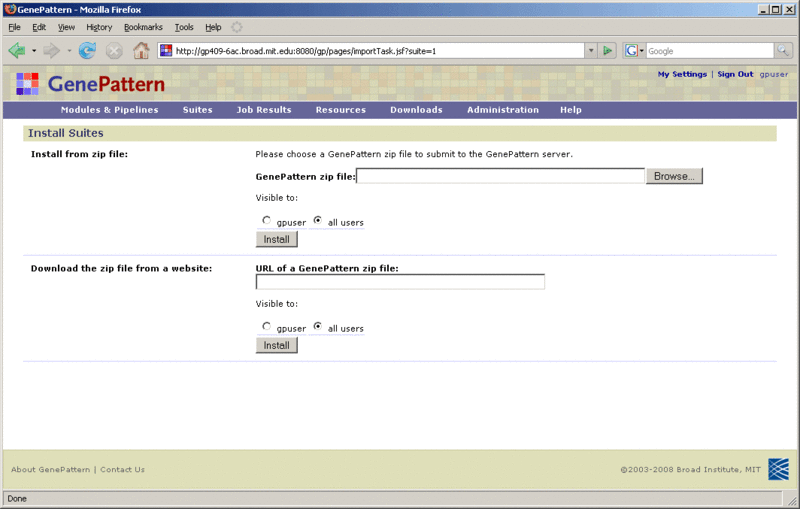
Managing Suites
Click Suites>Manage to display the Manage Suites page. From this page, you can
- View the suites installed on your GenePattern server.
- Delete suites from your GenePattern server. If the check box next to the module/pipeline is grayed out, you cannot delete it. Deleting a suite does not delete its modules.
- Click the menu icon next to a suite name to display the suites menu.
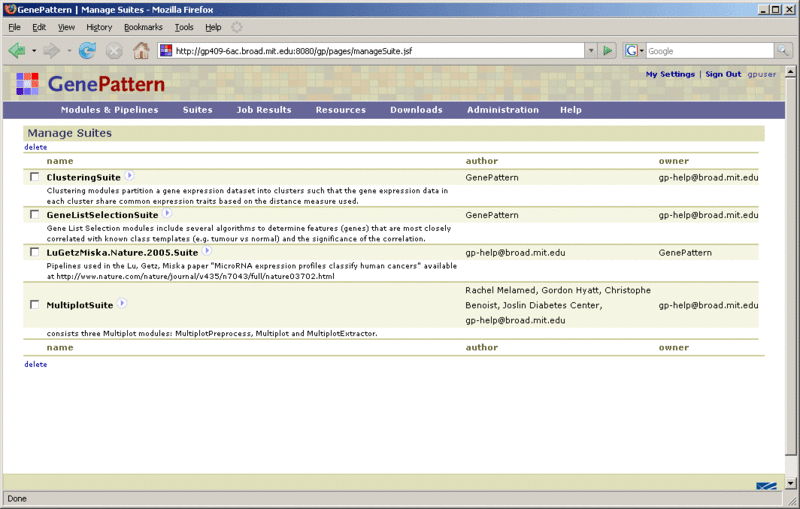
Working with Globus
The Globus platform (www.globus.org) provides researchers with robust file transfer, sharing, and search capabilities within data applications and services, while leveraging advanced identity management, single sign-on, and authorization capabilities. Since GenePattern build 373 (Nov 23,2021) the GenePattern server has integrated with the Globus platform allowing reserachers to login to GenePattern via Globus and to quickly and efficiently transfer large files between a GenePattern server and a researcher's Globus endpoints.
Authenticating with Globus
When Globus is enabled on a GenePattern server it will provide the ability to login to GenePattern using your globus identity, or alternatively linking a globus identity to an existing GenePattern account for the duration of a GenePattern session.
Logging in to GenePattern with Globus
On Globus-enabled GenePattern servers you will see the link to login via Globus beneath the usual GenePattern login. To use Globus to login you will click on the "Sign on using your Globus account" link as seen in the image below.
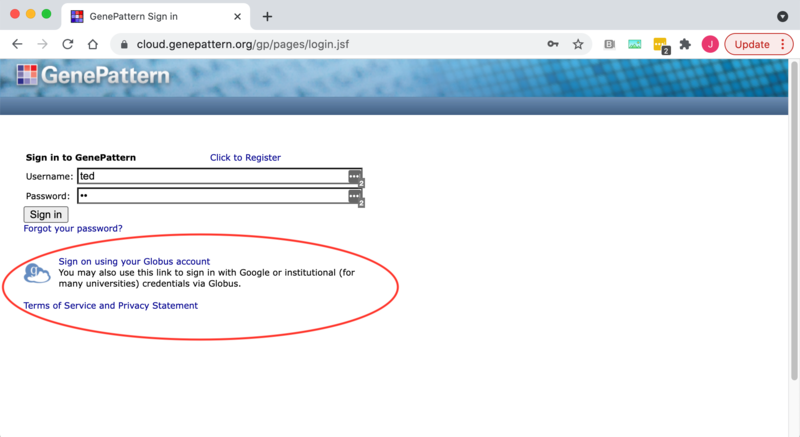
This will then redirect you to the Globus login page.
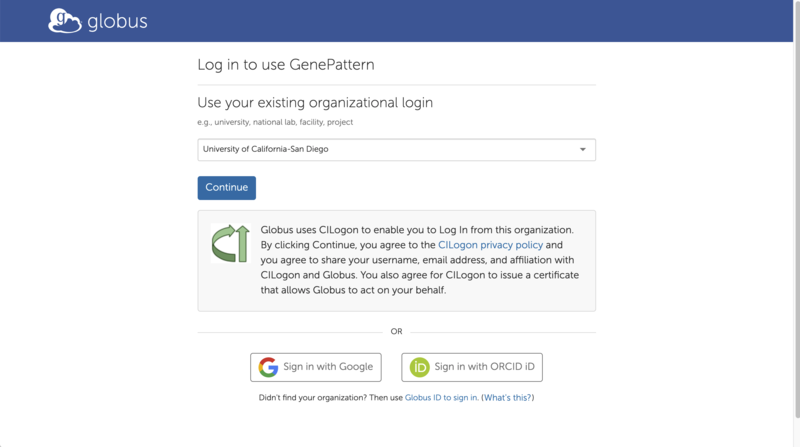
You can then continue logging into Globus according to its usual conventions. See the Globus "How To" guide for details about how to login to Globus.
Once Globus has authenticated you it will redirect you to the GenePattern home page. Your account name within GenePattern will be the email address of your primary Globus account.
Linking a Globus Identity with a GenePattern account
If you already have a GenePattern account and wish to associate it with your Globus account, you can do that as follows;
1. Login to GenePattern normally using your GenePattern username and password.
2. Click on the "Files" tab on the GenePattern home page.
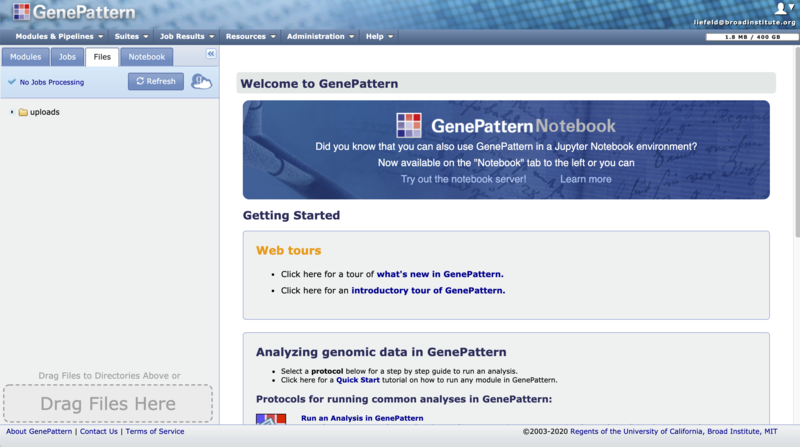
3. Click on the Globus icon next to the Refresh button to open the Globus slide-out menu.
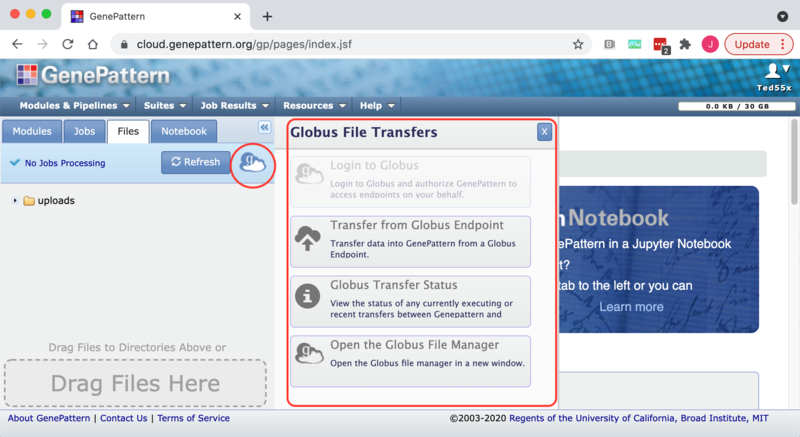
Clicking on the "Login to Globus" or "Transfer from Globus Endpoint" options on the slide-out globus menu will redirect you to the Globus login page. You can then continue logging into Globus according to its usual conventions. See the Globus "How To" guide for details about how to login to Globus. Clicking on the "Open the Globus File Manager" will simply open the Globus File Manager but it will not associate your Globus and GenePattern accounts. Similarly clicking on the "Globus Transfer Status" option will open the transfer dialog but will not log in to Globus or link your GenePattern and Globus accounts.
Viewing your GenePattern-Globus Identity
1. Open your GenePattern user settings from the settings menu by clicking on the silouette at the top right of the GenePattern page.
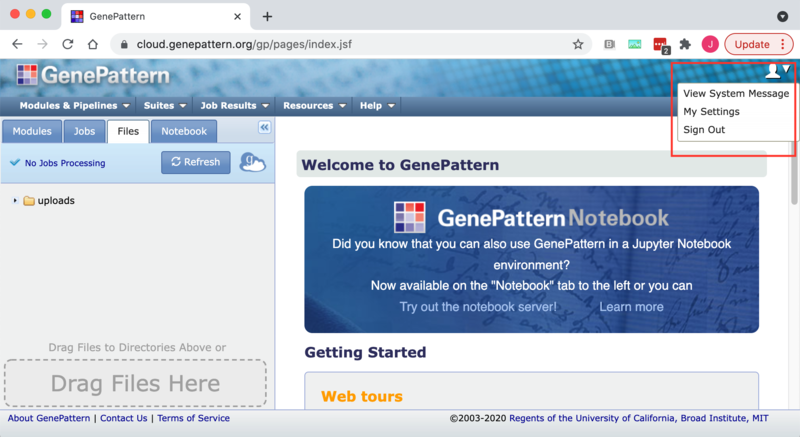
2. Select the "Globus" tab on the settings page. The Globus Preferred identity, primary email, and identity provider will be displayed.
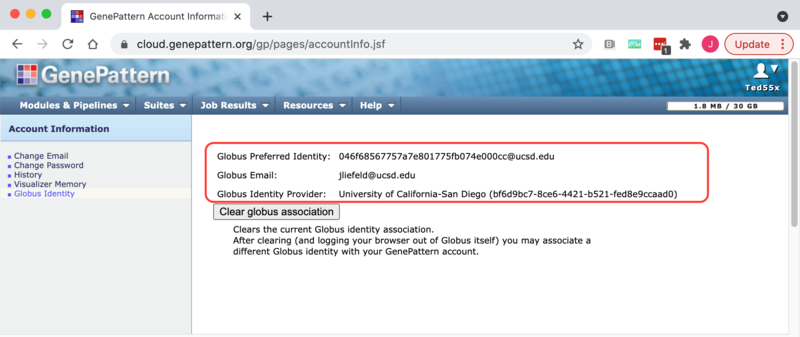
Unlinking GenePattern and Globus
If you wish GenePattern to forget the connection to a Globus account you can do this from the GenePattern user settings page.
1. Open your GenePattern user settings from the settings menu by clicking on the silouette at the top right of the GenePattern page.
2. Select the "Globus" tab on the settings page.
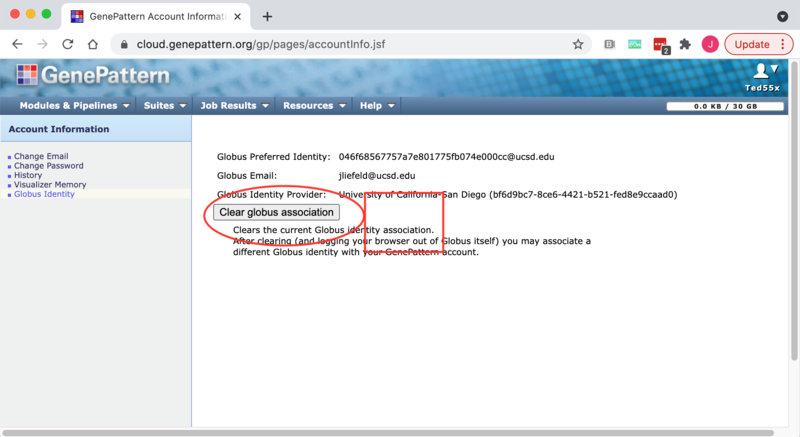
3. Click the "Clear Globus Association" button to remove the link between your accounts.
NOTE: If you are still logged into Globus then attempting to use any of the GenePattern-Globus features such as importing or exporting files will cause the link to be reestablished automatically. Therefore you should logout of the Globus File Manager either immediately before or immediately after clearing the association to prevent accidentally reconnecting the accounts.
Transferring files between GenePattern and Globus
Once you have either logged in via Globus or linked your accounts, you have the ability to transfer files between GenePattern and Globus endpoints that are accessible to your globus account.
Importing files from a Globus Endpoint into GenePattern
1. Click on the "Files" tab on the GenePattern home page.
2. Click on the Globus icon next to the Refresh button to open the Globus slide-out menu.
![]()
3. Click on the "Transfer from Globus Endpoint menu item. This will open the GenePattern directory selector dialog box to allow you to set the destination folder for the incoming file.
![]()
4. Click "Select" on the directory selector dialog. This will open the Globus File Manager to allow you to select a file on a Globus Endpoint. See the Globus "How To" guide for details about selecting files in Globus. Once you have selected the desired file to transfer in to GenePattern, click on the "Submit" button.
![]()
5. You will be returned to the GenePattern page and the "GenePattern-Globus Transfers" dialog will be opened to show the status of the transfer. This dialog updates at most once every 30 seconds. When the transfer is complete the file will become available in the directory selected in step 4. If an error occurs you may hover over the status in the transfer dialog to see the error message or go to the Globus File Manager to look for additional information with the "View on Globus" button.
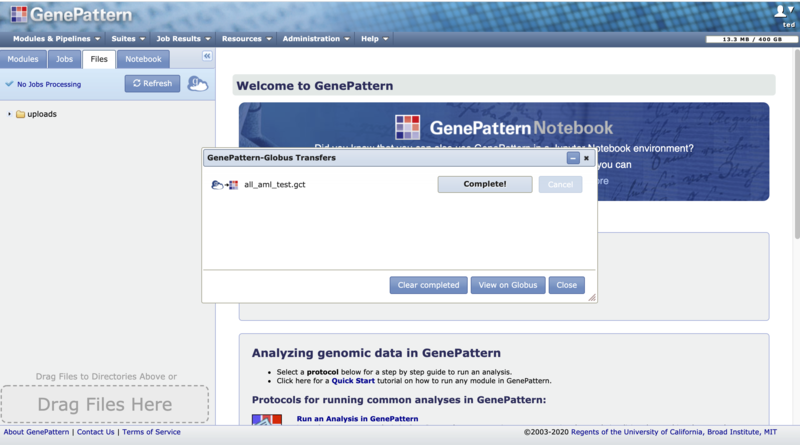
Exporting a file from GenePattern to a Globus Endpoint
1. On the GenePattern home page either click on a file on the Files tab or on a result file on the Jobs tab. This will cause the File slider menu to appear
![]()
2. Click on the "Transfer File to Globus Endpoint" menu item. This will open up the Globus File Manager in a new window. Use the Globus File Manager to select the desired Globus enpoint and directory to transfer the file to. See the Globus "How To" guide for details about how select an endpoint or diectory.
3. When you click "Submit" you will be sent back to the GenePattern page and the "GenePattern-Globus Transfers" will be opened to show the status of the transfer. This dialog updates at most once every 30 seconds. When the transfer is complete the file will become available in the directory on the remote endpoint selected in step 2. If an error occurs you may hover over the status in the transfer dialog to see the error message or go to the Globus File Manager to look for additional information with the "View on Globus" button.
![]()